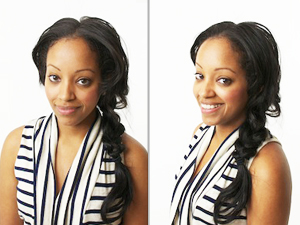
Day 4: A braid that wins the “all-around” award
1. I start with a center part. (It’s just the way my part naturally falls, and I don’t feel like forcing it into a side part this morning.)
2. To add more texture, I apply a styling mousse to my damp hair and comb it through (try Pureology Colour Stylist Silk Bodifier Volumizing Mousse, $24). I want to make sure my hair has plenty of lift for this look, so I use a teasing comb to tease my hair near the crown.
3. I allow the mousse in my hair to air dry, and then I wrap large pieces of hair around a 1 1/2-inch curl stick to create extra texture for the braid.
4. I bring all of my hair over one shoulder and start braiding it from below my ear. “If you’re going for a more casual look, leave out a good chunk of your ends when you secure the elastic,” says Dunton. I’m definitely going for that vibe, so I secure my braid several inches before I reach the ends.
5. I use my fingers to loosen up the look, and let the braid fall over the front of my shoulder.