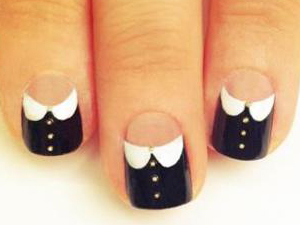
Peter Pan Collar
Polish Suggestions: Milani Nail Art Lacquer with Precision Brush White Canvas (white), OPI Black Onyx (black)
Other Tools: binder paper ring stickers, microbeads
1. Start with clean nails — no polish or base coat.
2. Apply a binder paper ring sticker to the base of your nail. (This will keep the base of your nail clean, and make it easier for you to achieve the collar shape.)
3. Apply two coats of black nail polish, from the tip of your nail to the curve of the sticker.
4. Using a nail art brush draw two half moons by the sticker to create the “collar” part of the design.
5. Once all the polish is completely dry, peel off the binder stickers. If your collar runs onto the non-polished portion of your nail, use a small brush or Q-tip dipped in nail polish remover to clean up any imperfections.
6. Apply a top coat to your nails, and stick three microbeads — you can find these at your local craft store — in a row, to create the buttons. The top coat will hold the beads in place.
7. Apply another top coat to seal the entire look.