Studded Cuff Instructions
Get the Look:
1. Cut a piece of teal ribbon so it’s a few inches too large when you wrap the ribbon around your wrist.
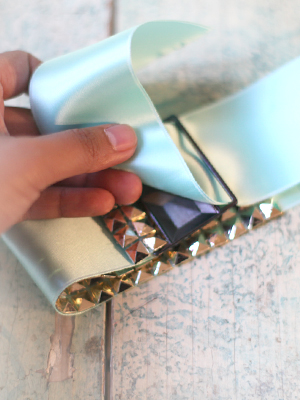
2. Cut the strip of plastic studs (you can find these at most fabric stores), so it’s a tiny bit smaller, like 1/2-inch, than the teal ribbon.
3. Place the studded strip on top of the teal ribbon and center it. Sew the two pieces together at the places where the studs are attached to one another.
4. Once they are attached, loop one end of the ribbon through the belt clasp, and secure it underneath with a strong glue, like E-6000.
5. Wait for the glue to dry, then pull the other end of the ribbon through the other side of the clasp. Try it on your wrist. Once you have found the appropriate length, cut off any excess ribbon underneath, but leave at least 1/2-inch to run through the other side of the cuff.
6. To secure this side of the clasp — and allow you to remove the cuff when you’d like — attach a magnet (with a strong glue) to the underside of the cuff, and another magnet to side of the ribbon that pulls through the clasp. The two magnets should line up and connect to hold the cuff in place.
1. Cut a piece of teal ribbon so it’s a few inches too large when you wrap the ribbon around your wrist.
2. Cut the strip of plastic studs (you can find these at most fabric stores), so it’s a tiny bit smaller, like 1/2-inch, than the teal ribbon.
3. Place the studded strip on top of the teal ribbon and center it. Sew the two pieces together at the places where the studs are attached to one another.
4. Once they are attached, loop one end of the ribbon through the belt clasp, and secure it underneath with a strong glue, like E-6000.
5. Wait for the glue to dry, then pull the other end of the ribbon through the other side of the clasp. Try it on your wrist. Once you have found the appropriate length, cut off any excess ribbon underneath, but leave at least 1/2-inch to run through the other side of the cuff.
6. To secure this side of the clasp — and allow you to remove the cuff when you’d like — attach a magnet (with a strong glue) to the underside of the cuff, and another magnet to side of the ribbon that pulls through the clasp. The two magnets should line up and connect to hold the cuff in place.